I love the smell of plastic in the morning.
OK, not really, but how else was I going to butcher that iconic line from
Apocalypse Now?
And what I'm about to describe was certainly close to apocalyptic! A strange mix of brutal reality and surrealism, with quite a bit of physical action and pain thrown in.
That vaguely Jurassic looking thing on the workbench, fresh off the truck from
etrailer.com, is the hitch and wiring harness for our new Ford Escape
Since few cars come from the factory with hitches now days, and our recycling trailer is too small to tow safely behind the van because I can't see it back there, an after-market hitch it is.
After trolling around on the web for a while, I settled on a Curt receiver hitch and wiring harness from etrailer for our new Ford Escape. While I was at it I threw in a mounting bracket to wrestle the 4 pole flat trailer connector into submission.
For years I've just let this little guy dangle there near the hitch receiver and swing in the breeze, but this time I thought I'd try something a little different. (Years ago at a rest stop during a camping trip with my Aunt and Uncle following me down the highway, the first thing they did was walk over to my truck and angrily jam the connector into one of the chain loops. "Watching that thing swinging there mile after mile is driving us crazy!!")
Everything arrived on schedule and intact. (The tracking site etrailer uses even includes a cool little map showing where your package is coming from, going to, and were it was the last time it reported in.)
After wrestling and cutting my way through the plastic and tape wrapped round and round my purchase I had all the bits and pieces laid out and there was nothing left to do but the actual install.
One of the reasons I chose etrailer is because they include handy videos walking you through the install of the various products, but come on guys! How many of us have lifts in our garages, panel pullers in our toolboxes and spare bits of aircraft tubing laying around??!!!
Around my place this is the closest thing to a lift I can come up with. The leveling blocks I normally use for my Class B motorhome. They only get me up an additional 3 inches, but every little bit helps.
I've got a 20 ton bottle jack and jack-stands heavy enough to hold up a house that would get the thing higher, but with the engineering of cars now days I'd be afraid of punching a hole right up through the frame and into the driving compartment!
So I had to settle for leaving the front wheels out on the ramp leading into the shop which probably lifted the rear bumper an additional quarter inch. Just enough to compensate for the thickness of the shop-mat I was to spend the next several hours laying on, so at least I had all of those measly 3 inches!!
And yes, I said several hours. I won't tell you exactly how many since its embarrassing, but it was far more than the videos and install guides said it would take, which probably says more about my mechanical skills than it does about the accuracy of their estimates.
As I was prepping things to install the hitch, I finally woke up to the fact that maybe I better install the wiring harness first, before I get the hitch up there in the way. (And boy, that turned out to be a good catch!)
Having disassembled wire looms and tracked, cut, and spliced wires before, the T connector harness from Curt seemed like a very good idea, just plug it in at the tail lights and I'm good to go. And with separate turn and stop lights on the car I needed one of those converter boxes to combine the two into one for the trailer anyway.
But I have to admit that during my initial research for this project, when I first watched the video on installing the harness and saw I was going to have to 'loosen body panels and break plastic rivets' on my brand new car, I turned it off and walked away for a few days.
Apparently during those few days nobody came up with a better way to do the deed so there I was, with harness in hand, getting ready to mangle our brand new car.
That's the T connector for the left side in my hand and dangling from it is the little box that houses the converter. The bundled up green wire at the bottom is the T connector for the right side.
Take note of the distance between the T connectors in my hand and the converter box and compare that to the car just behind. This is going to be important in just a moment.
In the photo the tail light has already been removed and the body panel that has to be loosened is the one there directly behind the dangling harness.
Oh, and by the way, I learned that if your new car comes with the
kick-open tailgate, the one where you can wave your foot under the
bumper to get it to open or close, because it was part of option
package, you have to remember to take the key-fob out of your pocket and
put it somewhere far away. Otherwise, when you're back there concentrating on pulling
taillights the tailgate is going to
accidentally close on your head!! But not to worry, once the hitch is in place the kick sensor will be blocked and it won't do that anymore.
OK, now that the tailgate isn't trying to decapitate me anymore. . .
With the two screws and plastic rivet removed as per the video, this panel, which is plastic, still doesn't move a whole lot and I cringed watching the guy in the video attack it with a pry-bar but apparently there's no other way short of drilling big gaping holes where there should be no big gaping holes.
But here's where I deviated from the instructions anyway.
First, rather than prying the plastic rivet up until it breaks with a panel puller that I didn't have, and not having 'spare rivets' laying around as they suggest, I used a sharp chisel to cut the top off the rivet which actually leaves a stub up through the hole to help keep things in place afterwards in lieu of a new rivet.
Second, the instructions have you jamming the entire harness, right side T connector, converter module and all, down past your pry-bar and through that very tight gap until it all drops out the bottom near the bumper.
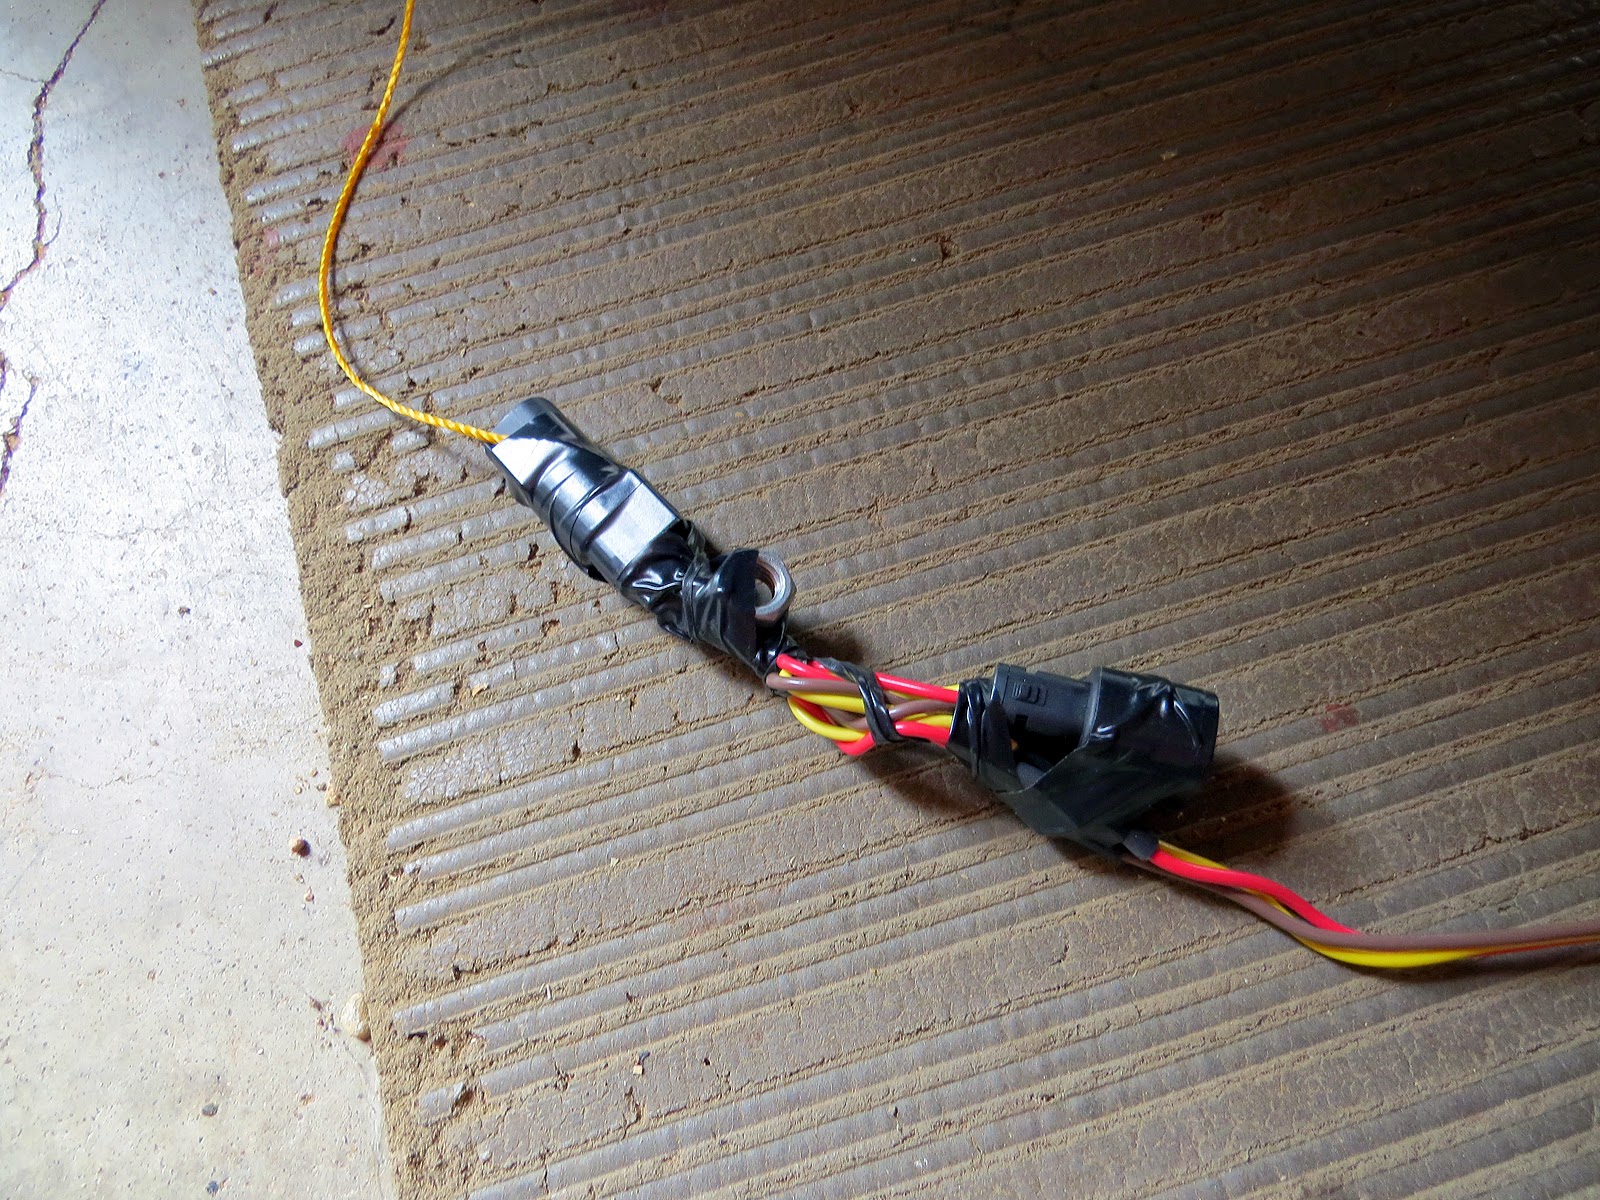
I'm sure there's a reason for that but I couldn't see what it was. Instead I tied a nut to a bit of string,
dropped it down the gap behind the body panel (At this point I still had hopes I could get the harness in place without removing the rivets, which is what that large black dot there by the string is, but alas, it was not to be. . .)
and out the bottom by the bumper.
Then I taped the end of the T connector to this
and, with some pulling and as little prying as posible, snaked it up where it belongs.
Remember that photo a while ago showing the distance between the T connector and the converter module? Well right about now is when I discovered just how significant that distance is. To keep the T connector from getting lost back down the hole I went ahead and plugged it in and reinstalled the tail light, but when I got back down under the car I discovered that the converter module was way up inside the bumper and pretty much unreachable. Oh, and since I hadn't yet bothered to undo the bundled up right side T connector, it was up there too, along with the rather short grounding wire and the stub of the power wire.
So off came the taillight again. By dropping the T connector down as far as I could without loosing it
the control module came back into reach.
From here I was able to get the white ground wire grounded with the provided self-tapping screw, splice on the extra length of wire that will be used for powering the module and unbundled the right side T connector.
After stringing it across inside the bumper and following pretty much the same procedure as with the left, I snaked the right side T connector up to the tail light housing where it belonged, but I must say, they didn't waste any wire on that side either. An extra 6 inches of wire on both sides would have made the install a whole lot easier.
As it was, with everything all hooked up and the tail lights reinstalled, and with the control module sucked up there inside the bumper again, I couldn't figure out how I could use the provided double-sided tape to secure the module in place since everything up there is curved, so I zip-tied it to something instead. I couldn't really see what it was but it felt pretty sturdy.
At this point I checked the tail lights to make sure they still worked. Fortunately that was a yes.
One thing not mentioned in the video, nor the Ford owner's manual for that matter, is when reinstalling the tail light assemblies you need to make certain that the rubber 'flashing' in the upper part of the door gutter is positioned properly back over the taillight assembly. In the photo above the flashing is not yet in it's proper position and any water running down the gutter will get in behind the light assembly.
All that's left now is to run the black wire that powers the converter module up to the engine compartment.
I say like it's nothing, but doing this while the car is sitting on the ground and you're jamming yourself under it in too little space is a major undertaking!
Here I've got the wire routed up and over the left rear suspension and along the parking brake cable. I've also managed to get an electrician's fish-tape fed through a handy frame member running from near the engine compartment back to around the mid-point of the car. (Again, what normal garage has pieces of airline tubing laying around??)
With the wire pulled through that frame member, I removed the left front tire and, after several tries, managed to feed the fish-tape blindly down through the engine compartment and out near the suspension
and fished the wire up to near the battery. I cut off the excess, (Oh sure, here they leave plenty of wire!!) attached the supplied fuse holder, connected the other end to the positive battery post,
inserted the fuse, secured and tucked everything away
and snapped the cover back over the battery.
Of the 4 black covers you see in this photo, the top one in the middle is covering the battery.
That's right; the battery is half buried under the windshield gutter! You can't even get close to the negative post! Just the simple task of replacing the battery requires removing the gutter/cabin air filter assembly, which also requires dropping the brake fluid reservoir and removing the wiper arms! And this is just the 4 cylinder 1.6L engine. Supposedly there are two larger engine options that will fit in here as well. . .
Taking a short timeout
In contrast, this is a photo of the 6 cylinder 3.0L engine in our Sprinter van. I can pretty much climb into the engine compartment with it!
Aaaannnd we're back!
A quick test with a meter shows the new harness is working as intended so now I can finally get to the hitch itself.
The first thing the video for the hitch install shows is that I've got to take a die grinder to the frame of our brand new car in order to be able to fit the bolt heads into the frame members.
Well hell! That didn't sound like such a great idea! I don't know exactly what finish they've used on the frame but I do know a lot of time and thought went into figuring it out, then a complex spray-dip-spin and bake process used to ensure everything is well coated and protected.
Grinding that finish off and exposing the highly engineered steel (Another way of saying just enough but no extra.) under it to corrosion wasn't my idea of starting out our relationship with this new vehicle on a good note.
So I went another route.
OK, OK. I know there's all kinds of things wrong with this but I'm willing to accept that, because when in use these bolts are going to be put in shear, not tension. Which is good because tension would put the strain down the axis of the bolt and into the head, which I have clearly compromised.
But any downward force on the hitch from tongue-weight, backward pull from acceleration or forward push from deceleration, puts the force across the bolt's axis, in shear, and little to none of that gets to the bolt-head.
Besides, this hitch is rated to 3500 lbs. Since that's actually more than the car weighs, and exceeds the GVWR by so much it's not even in the same zip code, relatively speaking, I'm going to be putting very light loads on this hitch and its hardware.
So instead of grinding on the new car, I took the bench grinder to the bolts themselves.
When doing things like this I keep a pan of water beside me and hold the piece in my bare hands. That way I guarantee I'm not going to get it anywhere nearly hot enough to tamper with the molecular structure and any heat treatment it might have gone through during manufacture.
A quick spray with a rust inhibitor adds back some of the corrosion protection I just ground off.
Threading the bolts and washers into the frame members with the supplied fish-wires was relatively quick and simple, if you ignore all the up and downing and squirming around on my back and working with my arms over my head that is.
At this point the video suggests two people to lift the hitch into place and get the bolts through and holding it. That's all well and good but, as usual, last time I looked, I was the only one in the shop.
Fortunately, there's some sort of pipe or rod or something over on the right side suspension; that's it in the top right just in front of the far bit of the orange strap; and some 'ear's' on the forward end of the hitch brackets. (These can be seen clearly in the very first photo of this blog entry.)
By lifting the right-hand ear up and resting on this pipe/rod/something and using a strap to make sure it would stay there
I was able to go back over to the left side. lift that 'ear' up and get the bolt through to hold it.
Threading a nut on that side a few turns to make sure nothing came loose, I went back to the right side and got that bolt in place and the nut also loosely threaded. Then I could safely remove the strap.
Next it was a just a matter of pivoting the hitch up and getting the rear bolts in place.
It sounds so simple writing about it, but the printed word does a poor job of conveying all the getting down on the floor, then up again, and squirming on my back, and holding my arms up over my head, and discovering the tool I need is just out of reach, or that I can't find it because I'm laying on it, and fighting to work within tiny spaces and too little clearance and a head that suddenly weighs far more than is good for my neck.
Regardless, this part of the install was going great; right up until I got to feeding the last bolt through the hole, the one on the left rear. For some reason that sucker just would not come through the hole far enough for me to get the nut threaded on.
I struggled with it for quite a while, and by quite a while I'm talking nearly two hours, which admittedly included some rest and cussing breaks.
I checked the hole alignment with finger tips and then mirrors with headlamps held just so to give me light to see by. I tried shaking things around and probing with a bent piece of wire. I fed the bolt back to the access hole in the frame to see if I could spot anything wrong but could never manage to get it back out the hole. I tried threading a second fish-wire backwards down the first to push the washer out because maybe it was jamming at an odd angle. I even tried grabbing the half thread I could get exposed with forceps to help pull, which didn't work at all by the way and I knew that before I tried but was getting desperate. All the while more than half sure that I was going to jerk the fish wire free and lose the bolt and washer inside the frame member where it would be a perpetual rattle.
I finally got the bolt far enough through to expose a few threads, though I'm not sure what I did different that time. But now the fish wire, which has a coiled end to thread the bolt into, was jammed somewhere and would not thread off the bolt.
I ended up uncoiling a few threads worth of it by shear force, then once I had the nut on, cranked it down on the remainder of the fish wire and kept going until I had a comfortable amount of the bolt pulled through. Then I backed the nut off part way and, with more shear force (That wire is pretty thin but it is damn strong stuff!) continued to unwind the fish wire until it was jammed tight and wouldn't unwind any farther.
Figuring the worst that would happen now would be to leave that last little bit of the fish wire behind, I grabbed on and pulled and bent and yanked until it finally let go.
But wait, the damn thing wasn't done with me yet!! Damn, so close. . .
The instructions say to torque the 4 bolts down to 110 ft. lbs. Again, a torque wrench is not something I have hanging around my shop, so I figured that hanging most of my weight on the end of a 12" long socket wrench handle would have to do.
Except that one bolt, the forward bolt on the right side, refused to allow a socket anywhere near it because it's tucked in there behind the very same pipe/rod/something that allowed me to pivot the hitch up into place on my own.
In the photo above you can't quite see the stud sticking out just above the coil-spring cap that holds the fender-well cover in place with a push-on clip. Here I've removed my second tire of the day, and then the push-on clip and pulled the cover back to get access to the elusive, shiny gold nut.
After strugling to get 1/4 turns at best out of an open-ended wrench and finishing off with even shorter bites with the closed end, I finally got that nut tight enough for comfort. (My comfort anyway, but then I was pretty well whipped by then too, so as long as it didn't fall off in the first mile I would probably count it as good.) Then I put the cover back over the stud and drove the clip home by pushing it in place with a socket. Of course I had to get up, track down a socket small enough, then get back down again before I could actually do this.
Is it just me or are tires getting heavier??? All I know is that getting that last tire back on the hub was a bitch and I wasn't in the mood for any more bitches by then!
But I was almost done!!
I lined the square 4 pole bracket up to the round hitch tube over to the left of the receiver and clear of the chain-loop, slapped a bit of tape on the tube so the drill-bit wouldn't wander and pre-drilled for the ridiculously small self taping screws supplied. Two more shots with my battery powered driver and the bracket was secured.
True to form it took me two tries to get the connector installed in the bracket because the first time I put the cover on backwards and the ground-pin hole in the cover was on the wrong side.
Then it was down on the floor again and squirm under the car one last time to secure any excess connector wire with another couple zip ties.
OK, maybe not one last time since I had to squirm back out, get up, with a lot of pain and groaning, fetch the side cutters I left laying too far away, get back down, more pain and groaning, squirm back under and trim off the excess bits.
While I had the oportunity I kicked the debris from my strugles out of the way and backed the car into the shop far enough so that all 4 tires were on the slab, the only place we've got that is reasonably level. I did this so I could measure from the ground up to the top of the hitch receiver, 14.25".
When my body quits screaming every time I try to use it for anything more than reclining in my chair, I'll drag the recycling trailer into the shop, level it up and measure from the floor to the inside top of the hitch socket. Then I'll know how much rise/drop I need in the ball-mount in order to keep the trailer level or slightly down in the front when towing it. (The worst thing you can do is have the front of the trailer high. This throws the center of gravity towards the back of the trailer and if it gets behind the axle the trailer is going to sway uncontrollably and pull you right off the road!!)
As it was, cleaning up my mess was struggle enough to finish out the day and this morning (I'm writing this the next day.) when I went to put on my socks my toes sure were a painfully long ways away!!!
But all in all, everything went pretty much as expected. There were a few wrinkles that a little pondering worked out, I got a little extra exercise, which I could use anyway, and now the new car is ready to take on what we ask of it.